Ingesting CSV Data for a Crypto Accounting App with Flatfile
2022/08/08
One of the things I've been struggling with lately is allocating my time efficiently. As a bootstrapping cofounder with a solo side hustle, time is my most valuable asset. Unfortunately, I also have a propensity to try to do everything myself--not because I'm a control-freak, but because I'm a generalist who enjoys learning about a wide range of topics. Pair that with a love for writing code, and it's not uncommon to see me throw hours away automating a task that would've been faster to do manually. Luckily I'm a human though, so I have access to the introspection ability, and can use it to identify and correct these behaviors. (not that they're fundamentally wrong, they're just not ideal for my current professional goals).
The two ways I've chosen to try to tackle this issue (and leave a comment if you have other suggestions) are
- Write less code
- Hire out
In this post, I'll focus on option one. It's not about some cool, new, l33t methodology for writing more succinct code, but rather an exploration of the value in not reinventing the wheel, and just choosing the correct tool for the job at hand. Thanks to Flatfile for sponsoring this exploration of their platform; a toolkit for data import so you don’t have to start from scratch.
Crypto Taxes
This part is primarily background information. If you're already familiar with how crypto taxes work, or just don't care, you can skip to the next part.
There are a number of nuances related to filing taxes when you've realized losses or gains in crypto. For the purpose of keeping things relatively simple, this post will focus on details specific to the US. To keep things even simpler, I'm not going to really go into the technical details of how the taxes are calculated. Instead, since we're focusing on the ingestion of data (in this case getting the transaction history data from clients), I'll explain what's necessary in order to calculate the taxes, because we need to know what data we actually want to ingest!
Firstly, there's a taxable event whenever you exchange one cryptocurrency for another or exchange a cryptocurrency into fiat. Secondly, the taxes you pay depend on how long you held the cryptocurrency for. Finally, we need to know the type of event that occured (buy/sell), the currency pair involved, the date, and the fiat value (USD in this case). Oh we'll also need any information we can get on the fee paid, which we can deduct from the taxable amount. Fortunately, most of this data is provided by exchanges when you export your transaction history as CSV, which segways perfectly to the next part.
Getting the Data
Since most (if not all) of the data we need can be exported from exchanges as CSVs, we're going to build our product to ingest this file type. Side note: do you ever think about how much of the world runs on CSVs? “Hey Alex, why aren't we using APIs? Most exchanges have them, and we're programmers after all.” Well, to be frank Frank, that is definitely a viable option! However, dealing with different APIs would require us to write a custom implementation for each API. Then we'd also have to maintain those implementations in case anything changes, and that just sounds like a longterm royal pain in the ass.
“But Alex, are you seriously suggesting that building a CSV ingestion tool is going to be easier?” No Frank, BUILDING it from scratch wouldn't be easier, but we're not going to do that. We're going to build with Flatfile's CSV ingestion toolkit instead, which comes with a bunch of additional bells and whistles to make both our and our users' lives easier.
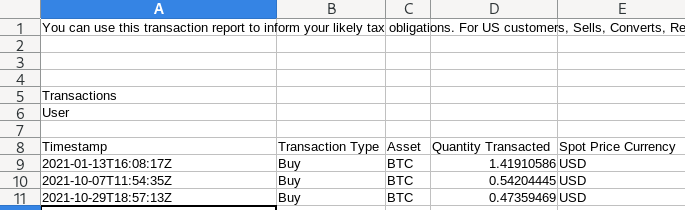
So there are a number of pretty time-consuming challenges we have to overcome for smooth data ingestion, but just like accepting disparate data from our customers, the biggest piece that makes this hard by far is managing data from different exchanges. For example, Coinbase exports have their symbol pair column split, whereas Binance, Kucoin, and Kraken all don't. On top of that, out of those four, only Coinbase has the USD value of the transaction. Coinbase also has the most poorly formatted CSV, as there's text before the actual header row, which is the fifth row in the file. This is actually super common for platform exports and all these little nuances start to add up.
As a single person setting all of this up, I'd probably have to dedicate most of my efforts to just getting this feature online. And it's probably (in my opinion) the most boring challenge to solve! Luckily, the embeddable component offered by Flatfile (Flatfile Portal) accounts for all of these edge cases, and more. But enough telling, time for showing!
Setting Up Local Dev
Rapid feedback loops are the Pinnacle of Peak Performance Programming. Eat up those peas. So first we'll get everything we need to test the ingestion backend locally. Just git clone this repo and follow the instructions to get it live (except the env vars part). All it really does is provide an express HTTP server, that serves a static HTML file, that loads in the embeddable CSV ingestion component and sets the json web token for a specific user. That last part is relevant to when the user uploads the data, since it'll register the data as theirs when you're checking it out in the dashboard. We can just use this template for now to test our data ingestion process and make sure it's working correctly while we develop it.
Setting Up the CSV Ingestion
So after setting up our account on Flatfile (14 day free trial for devs btw), we can access a dashboard that acts as our command center. The links we're interested in are the Imports, Flows, and Templates. Of course the documentation is also worth going over (specifically Portal for this project), but you can do that in your own time if you want. If you get stuck, they have free Dev Pairing sessions with their engineers, too.
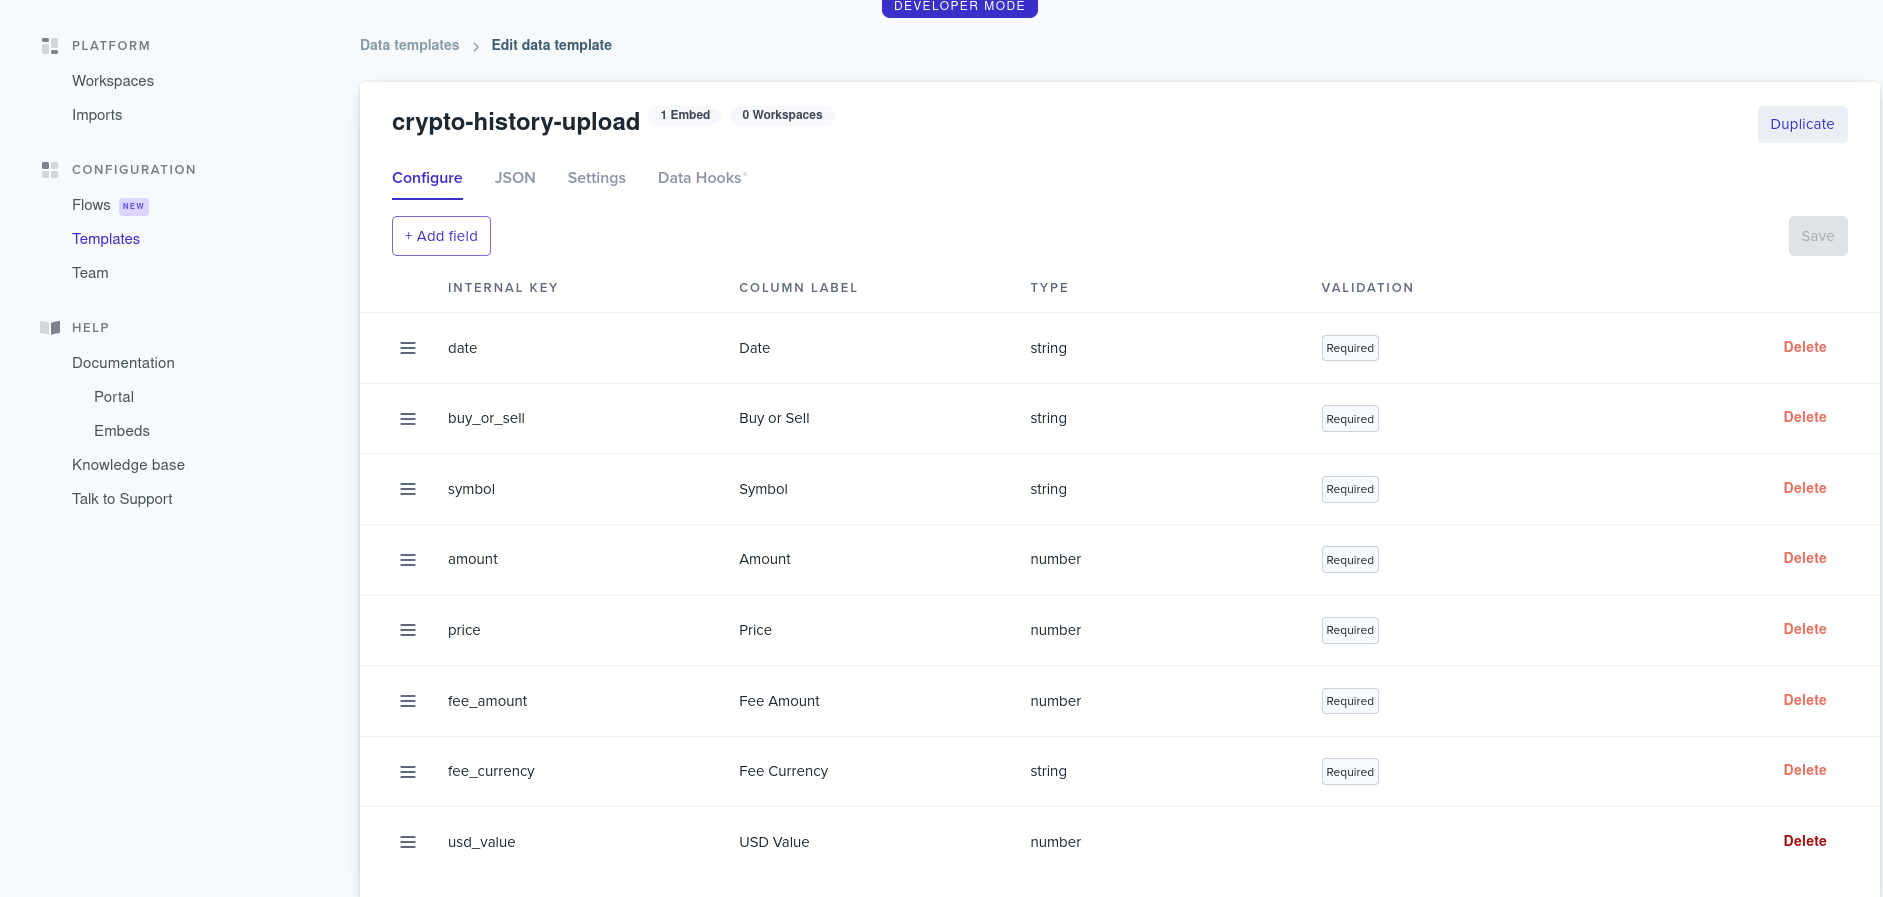
First we'll want to set up a Template. This is what we want our final data to be, or put another way, what all of the different CSVs should converge to. We can create it from an existing CSV, which I guess would be handy if we were migrating to this tool and already had existing data, but since we're starting from scratch, it's not really relevant to us. Instead we'll add one with the aforementioned fields relevant to our taxation calculation.
- Date
- Buy or Sell
- Symbol Pair
- Amount
- Price
- Fee Amount
- Fee Currency
- USD Value
- Base Asset
- Quote Asset
Adding the fields is pretty intuitive, so I'll just outline the different options we have, which include the key name, label, type (string, number, boolean, category, email, phone), basic validations like regex for string or min/max for number, description, default value, uniqueness, and required. We really only need strings and integers, but we could also experiment with category if we only wanted to support specific currency pairs in a dropdown list.
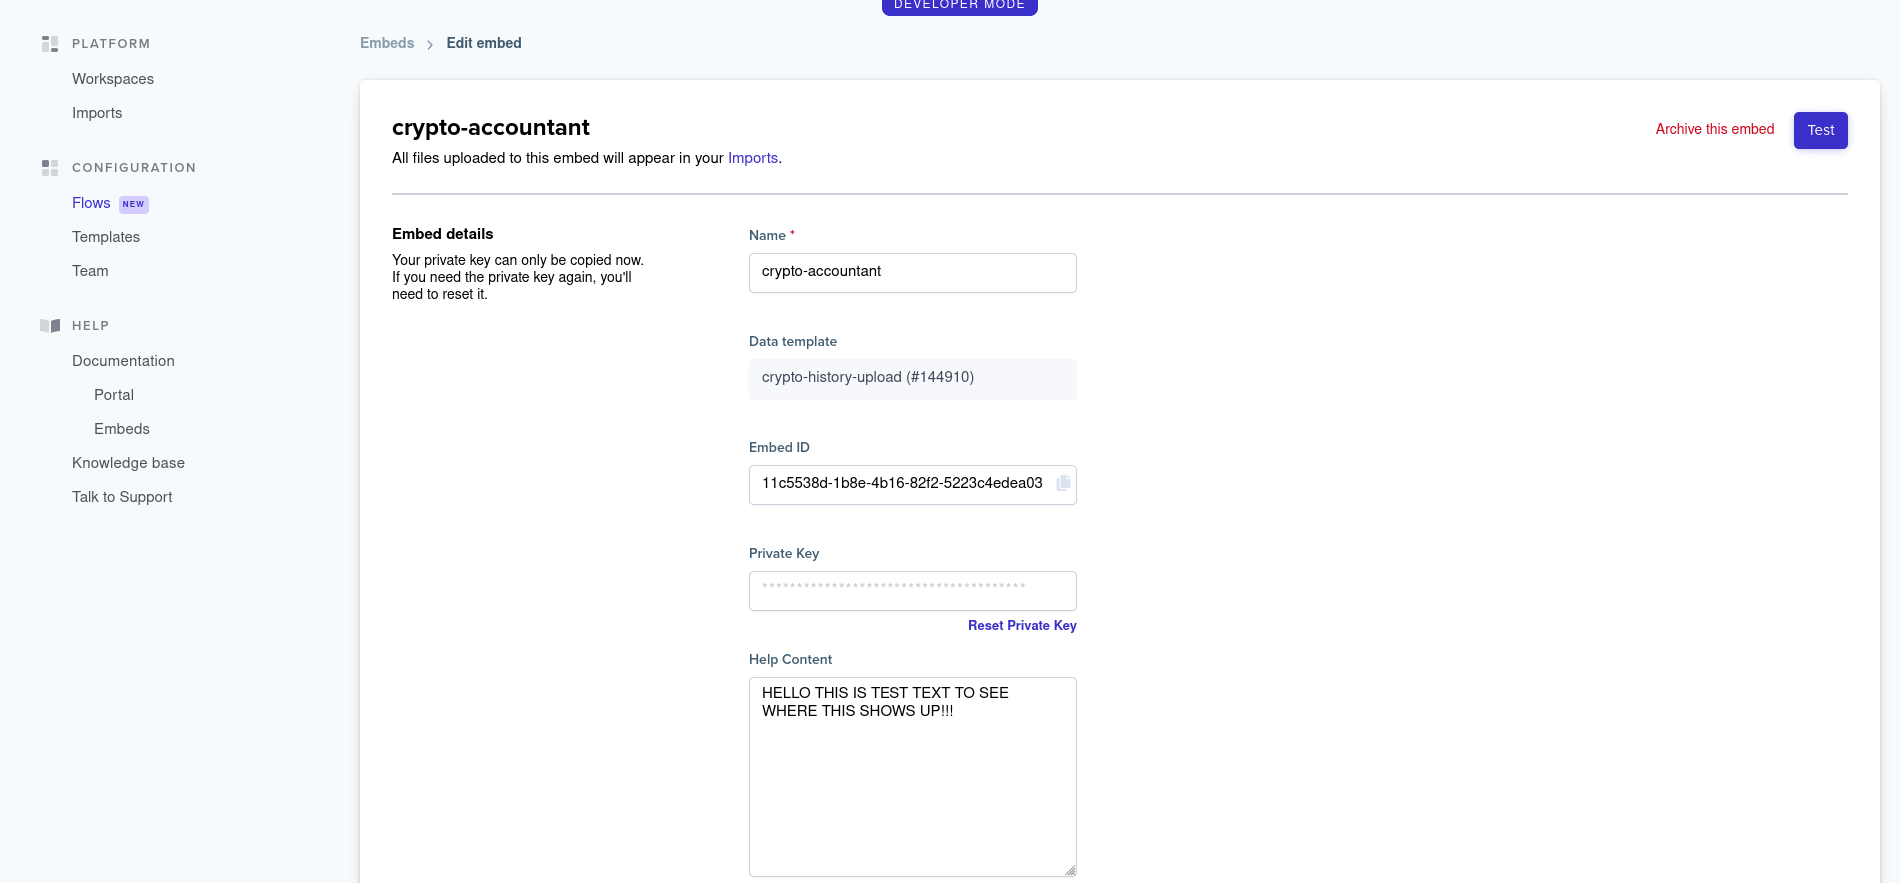
Now we can go back to the Flatfile dashboard, hit Flows under Configuration, go to Portal and create a new one using the data template we just made. (The embed is what allows us to plop it into our app.)
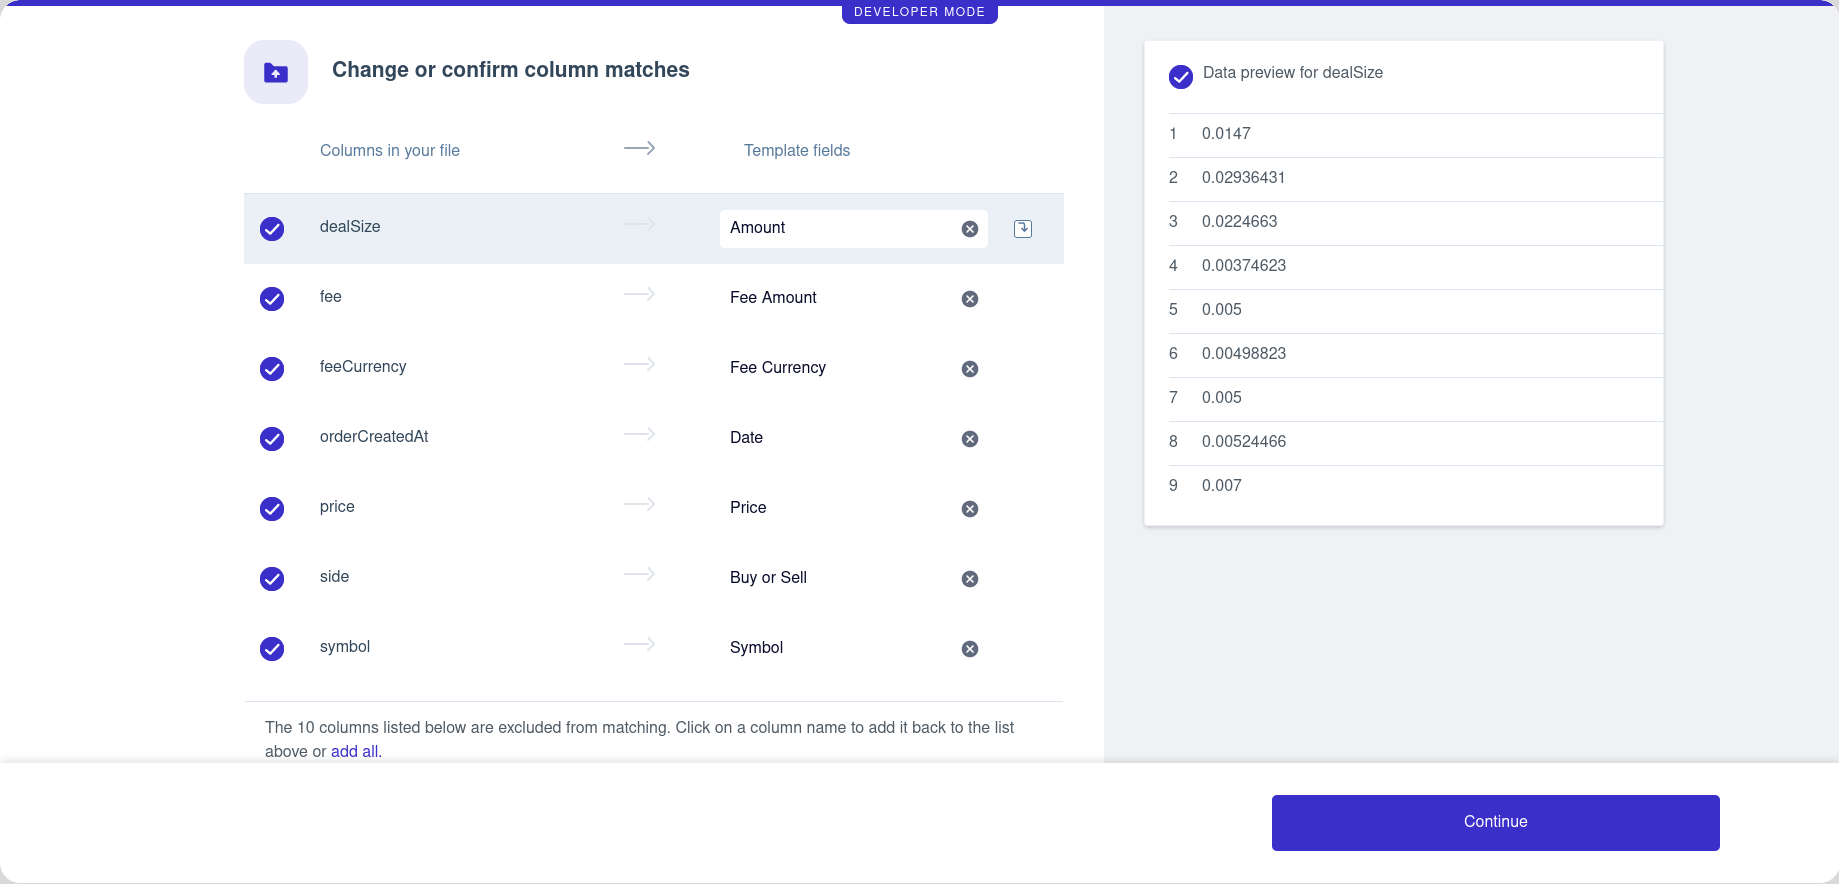
Stay on the page after creating and go to that repo we cloned, copy over the .env.example to .env and put in the relevant keys (from the previous page), then run npm start. The server is going to start up locally and you can navigate to it in the browser to checkout the basic flow users are going to be taking to upload their data. This is when we can really appreciate all of the built-in features, like header row selection, predictive column matching, data previewing, error catching, etc. If the user leaves the uploading early, they can automatically resume where they left off on the next visit. It's the whole shebang with practically no work, and it just works. We can check it out some more once we finish wrangling the data.
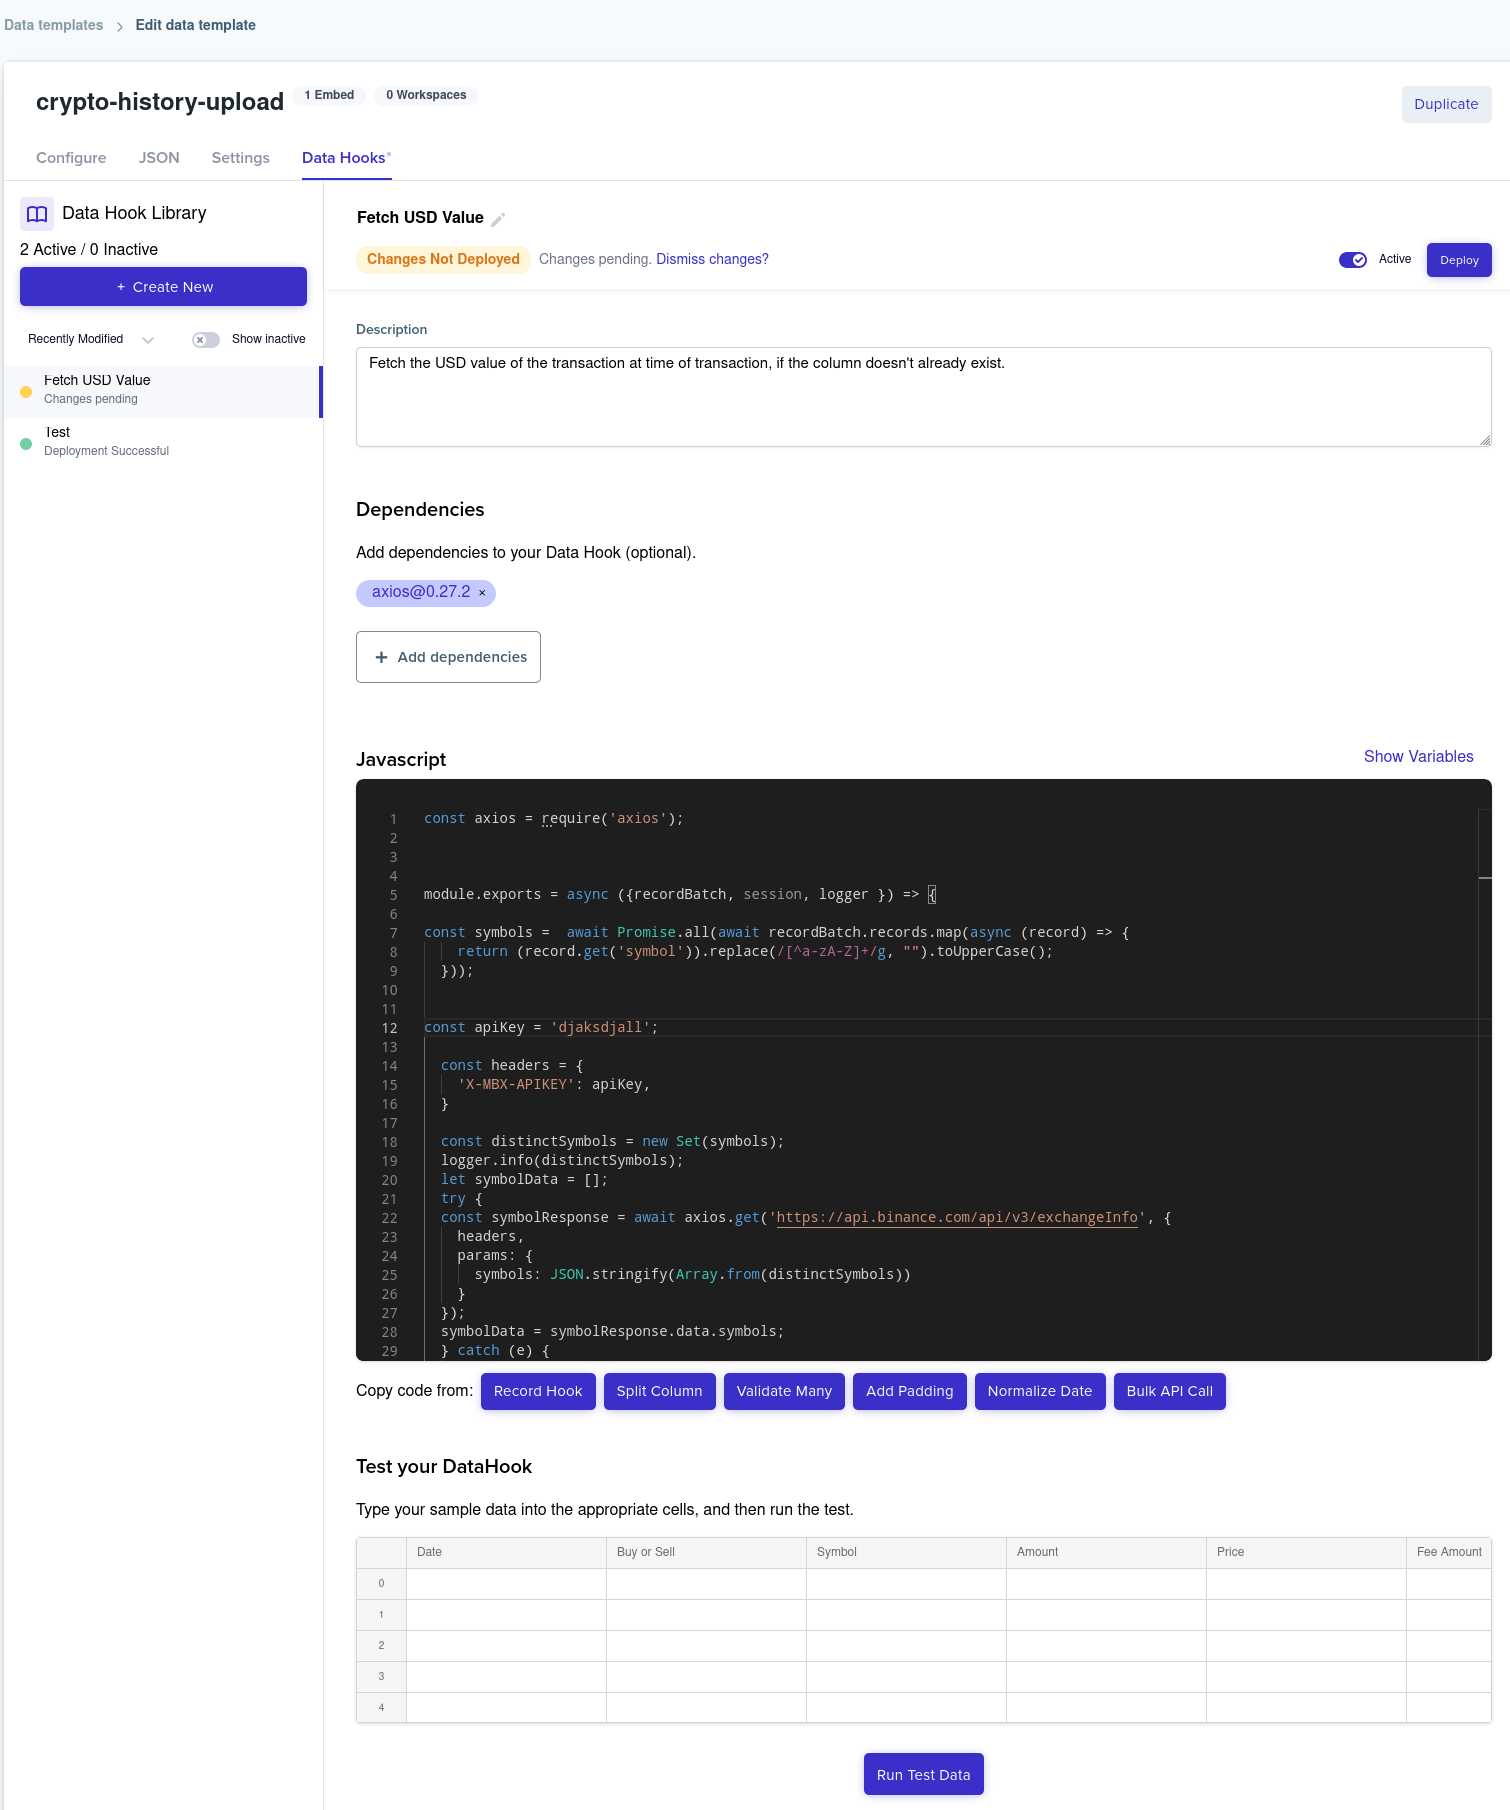
With the template columns sorted, now we can get into massaging the actual data using Data Hooks®, which go in between the user uploading their data and it going to our backend. Like I mentioned before, some of the exchanges don't actually export the USD value of the transaction that took place. This is a big no no, because we need that to calculate how much the cryptocurrency went up or down since someone bought it. To further complicate things, the symbol pairs are formatted differently for the four exchanges we're testing with, and that's relevant because we need to fetch the USD value for the cryptocurrency at the time of the transaction! It's looking like we'll need several async calls within the data cleaning step just to get all of the data we want, but that's no problem for the Hooks of Data (great band name).

Firstly a bit about the runtime (from what I could glean). Checking the process.version variable shows that it's running Node "Version: v14.19.1". Nothing too thrilling or exciting there, but I would've expected a more recent version looking at the fact that the starter template is using v17. v14 is the first version where you can use ?. though, so that's kewl. We're also free to add dependencies using the require syntax, but we have to lookup the repo in the search tool above the code editor. I found symbols like @ and / didn't work in the lookup, but just typing their name makes most of them pop up in the search.
As inputs to the function where we run our code, we have logger, recordBatch, and session. The logger lets us log info to the output, which we can see after the data hook runs. The recordBatch contains the rows of data we have access to. The only gotchya here is that the recordBatch is an array of maps (so we need to use set/get functions to update/access the values from the CSV). We can also add errors to the specific row and column with row.addError('column_name', 'error message') if we iterate through recordBatch. This is really handy when we encounter errors on any massaging we might be doing. The session has all of the info relevant to the session, like the environment and workspace IDs. Everything else is pretty much regular, good ol'Node. Under the code editor we have access to five rows, with columns from the template we just setup. This is where we can input test data to run the data hook on.
Developing directly in the code editor isn't great, because of two reasons. Number one, the feedback cycle is a bit tedious. Everytime we edit the code, we have to redeploy, which wipes the test data, meaning we have to add it again. Number two is that the environment eats up any potential errors, leading to cryptic messages like "Can't read property 'row' of undefined". These things are inconvenient, but are mostly negligible if we just setup the same environment locally. When I brought up the previous issues with Flatfile, they informed me that they are currently working on moving the development process to primarily be in their SDK, because that’s what customers asked for. It seems like they’re proactive with improving their product and these issues won’t be very relevant soon. Instead you’ll be able to just develop locally from the get-to, which is much more convenient. We can create a local .js file and add the following code to run it using node in the terminal
  const logger = { info: (text) => console.log(text) };
  const recordBatch = [
    new Map([
      ['key', value],
      ['key2', value2]
    ])
  ];

  (async () => {
    CODE HERE!
  })();
The code for this part is pretty simple, and we can just copy in one of the examples with async operations at the bottom of the editor (some of the JavaScript example code isn't correct; there are unnecessary awaits and an incorrectly used Promise.all, but I'll leave that up to you to solve, because LEARNING!). To get what we want, we can get all of the distinct symbol pairs in this recordBatch, run some string conversions to get them into a single format (remove symbols/spaces), and then query Binance's market data API to get information on the symbol pairs. We have to take this convoluted approach because we get symbol pairs in different formats, and sometimes there's no way to split the pair up to get the individual currency symbols (for example Binance just has the symbol as ETHBTC or BTCUSDT, and since a symbol can be three or four characters long, we can't just slice the string).
Once we have all of the symbol pair info (which conveniently splits the pairs up), we can query Binance again for each record, using the date of the transaction and one of the symbols (in this case the baseAsset) to lookup the candlestick data for that symbol paired with USDT at that specific time (code below). Why one minute candlestick data and not price at specific time? Because that's the cheapest solution that still works (we just need a fair market price at the time of transaction). Then we can just store the newly acquired symbol data and presto, we have all of the information we need!
  const axios = require('axios');

  module.exports = async ({recordBatch, session, logger }) => {

    const symbols =  await Promise.all(await recordBatch.records.map(async (record) => {
      return (record.get('symbol')).replace(/[^a-zA-Z]+/g, "").toUpperCase();
    }));


    const apiKey = API_KEY_HERE;

    const headers = {
      'X-MBX-APIKEY': apiKey,
    }

    const distinctSymbols = new Set(symbols);
    logger.info(distinctSymbols);
    let symbolData = [];
    try {
      const symbolResponse = await axios.get('https://api.binance.com/api/v3/exchangeInfo', {
        headers,
        params: {
          symbols: JSON.stringify(Array.from(distinctSymbols))
        }
      });
      symbolData = symbolResponse.data.symbols;
    } catch (e) {
      logger.info('Error', e);
    }


    await Promise.all(await recordBatch.records.map(async (record) => {
      logger.info(record);

      try {
        // replace everything except lowercase and uppercase symbols
        // uppercase it just in case
        const symbol = await (record.get('symbol')).replace(/[^a-zA-Z]+/g, "").toUpperCase();
        const symbolInfo = symbolData.find(s => s.symbol === symbol);
        const time = (new Date(await record.get('date'))).getTime();
        const candleInterval = '1m';
        const symbolFiatPair = symbolInfo.baseAsset + 'USDT';

        const response = await axios.get('https://api.binance.com/api/v3/klines', { headers, params: { symbol: symbolFiatPair, interval: candleInterval, startTime: time, limit: 1 } });
        if (response && response.data && response.data.length > 0) {
          record.set('usd_value', parseFloat(response.data[0][1]))
        } else {
          record.addError('usd_value', 'Invalid symbol')
        }
      } catch (e) {
        logger.info('error in retrieving USD value', e);
        record.addError('usd_value', 'Invalid symbol');
      } finally {
        return record
      }
    }));
  }
That's pretty much it when it comes to getting the data from the user. Now we need to figure out how to get it on our server. Not much to figure out though. Flatfile conveniently has a webhook we can use to notify us when an import is submitted, then we can query their API to get the data out. We'll just go to the Team part of the dashboard and subscribe to "Import submitted" events, and add the URL our server is going to be listening on.
Final Thoughts
There are probably two big points I didn't really mention so far, one being vendor lock-in and the other pricing. In regards to vendor lock-in, I wouldn't say it's very relevant, because you're not going to be changing the logic that processes the cleaned data (this is the advantage of putting all of the cleaning in the data hook). Pricing, on the other hand, is always relevant, and what I was told was "flexible". For early stage startups with low volume, it’s free. Once things start picking up, Flatfile will only start monetizing when your company can afford to pay them $10,000 a year.
It took me two days to create a data ingestion pipeline that could theoretically take weeks of full time dev work, plus maintenance. It's also a critical component that could directly influence if a potential customer chooses to use my product/service. If I was serious about launching this crypto accounting app (maybe I will?), I wouldn't have enough time to get bored of the idea and distracted by the next shiny thing, which I assure you would be the case if I had to spend more than a couple of days implementing the frontend myself. Now all I had to do was copy and paste some JavaScript into an HTML file and I was pretty much set.
In the grand scheme of trying to get away from writing code, and using the right tool for the job to save myself time, I'd say that in this case, Flatfile was an exceptional choice.