OAuth with Cloudflare Workers on a Statically Generated Site
2021/11/14
Update: this post was featured on Hacker News and sparked a lot of discussion. I also added a couple of more sentences to the conclusion to address vendor lock-in.
Intro
Recently I wanted to setup some buttons on this website that lets users sign up for the newsletter via OAuth. If you want to skip all of the intro/background info, check out the source code and jump straight to implementation. The motivation behind this was because I listened to a podcast by Dan of tldr.tech, where he emphasized the importance of having an easy sign up process. Since Dan is much more experienced than I am (his newsletter has over 100k subs), and the advice sounds reasonable, I decided to go about implementing it. You can see an example of what I'm talking about right below (it's what I actually use and will subscribe you to my newsletter).
Background
As a bit of background, the site is statically generated (SG), which means that all of the pages are prebuilt and then transferred to their storage location. If you’re unfamiliar with how static site generation works, I won’t go into the details, but a handwavy explanation is that you generate a bunch of files (html, js, css) that are webpages or components that are imported into those webpages. This is the simplest type of website, as opposed to a dynamically generated (DG) website, where webpages are built with the most recent data on request.
With modern tooling, you don’t need a server to host your SG site, because you can upload it to one of many different services (Netlify, S3 bucket, Github pages) and have them host it for you for free. This is great! And since we can run JavaScript (JS) in the browser, one might think implementing OAuth sign up is relatively trivial; after all, you just need to write a fetch request that redirects the user to the OAuth page, then another request that sends their email to the newsletter service of choice to sign them up. Well, the issue is that in order to do the second step of that process, one needs to hit an API endpoint that requires authentication (an API key). That is essentially a password and not something you want to expose on the front end and give everyone access to.
It’s a bird! It’s a plane! It’s a serverless function!
In the past, one could setup a virtual private server (VPS), run an HTTP server on it to expose an endpoint, then have that endpoint carry out registering the user with the newsletter provider service. It’s a bit of a pain to maintain a server, so here come serverless functions to the rescue! Although a bit of a misnomer (there is definitely a server), serverless functions are great in that you don’t have to maintain a server to use them. Since I’m already using Cloudflare to proxy the website, I figured Cloudflare Workers would be a good solution. I didn’t really know much about them, so here’s a bit of a breakdown.
Cloudflare Workers
At its core, a Cloudflare Worker (CW) just gives you access to something similar to a Node.js environment. The “Worker runtime” is built on top of the Chrome V8 engine, which is what runs the JS code you write in the browser or Node. There are some platform specific differences, which are mostly limited to the API calls you have available to you. If you know how to write JS, you can figure out how to use these within 5 minutes.
What I found to be a bit more complicated is the actual process flow when using workers, so I drew two diagrams to demonstrate the difference.
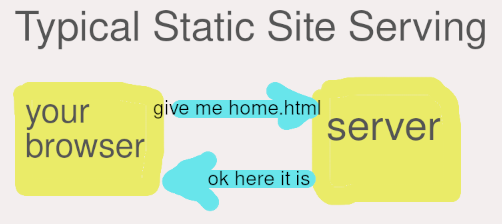
First one is pretty simple to understand. Your browser makes a request to the server for a file, the server serves that file. This explanation discards all of the networking that has to happen inbetween, but that’s beyond the scope of this article.
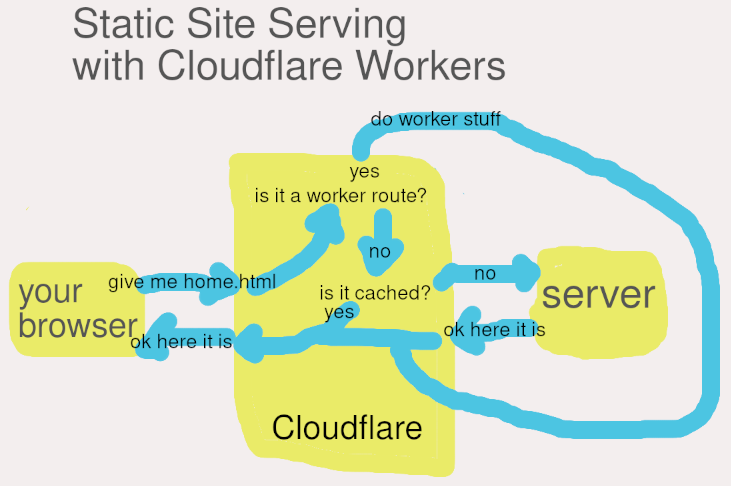
So this one is a little bit more complicated. When you’re using Cloudflare to proxy your site, their edge infrastructure sits between the client (your browser) and your server. They do this using DNS. Since using them requires changing to their nameservers for your domain, they have control over what IP address your domain points to. For all intents and purposes, we can think of the Cloudflare block in the diagram above as just a server or a group of servers that is owned and operated by Cloudflare.
When a request reaches the Cloudflare block from the client browser, Cloudflare is going to check if the URL for the request matches any of the worker routes. If it does, it’ll run the worker and ultimately return its results. There’s also some cache checking processes going on their with regular requests, but that’s really just a matter of checking if the file requested is cached or not, then returning it or hitting your server to retrieve it and returning it.
Implementing OAuth with Workers
Before we get into the implementation, I wanted to mention that you’ll need to register on the respective platform to get API keys that allow you to register users using OAuth. Pro-tip: if you’re registering for Google, don’t include a logo, as that needs to be approved and may take a long time.
A lot of the code I used for the implemenation was taken from this repo.
The original workflow in that repo looks something like this, excluding the CORS handling at the beginning, which can be summarized by saying that when the user clicks the link in the first step, it sends an OPTIONs request to the worker, which returns the CORS headers, and then starts the process below.
- User clicks a link to the CW route
- CW checks request type (GET) and fetches the OAuth URL using the service’s client secret/id (API keys)
- OAuth request returns a URL for the OAuth permissions granting page (for the user)
- CW returns response with a redirect that navigates the user to the OAuth page
- User accepts permissions
- User is redirected to your “success” page, which is set by you when registering for OAuth access with the service
- Success page JS executes on page load, checks URL for OAuth authentication code, and sends POST request to CW
- CW checks request type (POST) and sends a request to OAuth service API requesting user’s email
- Request with user’s email returns and another request is sent to newsletter service API registering that email
The hardest part about this whole process was just the counterintuitive fact that your registration request is sent from the success page, and not the page where the OAuth process starts. You can see an example of handling this for Github OAuth in the source code.
However, since the website is built using Svelte with Elder.js, my implementation for the success page was slighty different:
const WORKER_URL = 'https://github-oauth-login.alex-zdanov.workers.dev';

const browser = process.env.componentType !== 'server';

$: if (browser) {
	const code = new URL(location.href).searchParams.get('code');
	const error = new URL(location.href).searchParams.get('error');

	if (code) {
		// remove ?code=... from URL
		const path = location.pathname + location.search.replace(/code=w+/, '').replace(/?$/, '');
		history.pushState({}, '', path);
		login(code);
	}
	if (error) {
		location.replace('/');
	}
}

async function login(code) {
	try {
		const response = await fetch(WORKER_URL, {
			method: 'POST',
			mode: 'cors',
			headers: {
				'content-type': 'application/json',
			},
			body: JSON.stringify({ code }),
		});

		const result = await response.text();

		if (result.error) {
			alert(JSON.stringify(result, null, 2));
		}
	} catch (error) {
		alert(error);
  }
 }
One of the issues with Elder.js is that JS can’t be run on a “page” when loaded. This is because we can’t check on the page when it’s being rendered during build or on the client’s browser. There is a way around this though, by placing all of the code into a component file, and then importing it on the success page. Elder.js can hydrate components and gives you access to variables that allow you to check if the component is being rendered on the server or on the client’s browser. So in the code above, we’re checking for when the browser variable is set to true, then pulling the OAuth code from the URL and cleaning it up, followed by checking if the code exists and posting the request with the code to the CW in order to subscribe the user.
Conclusion
That’s pretty much it. It’s fairly simple with no real catches. CW seems to be a great method for running JS with API secrets when you don’t have a back end. In terms of vendor lock-in, the JS for the workers should be general enough to work in any serverless environment with a few minor tweaks. Furthermore, if you wanted to host this yourself, implementing the code on your own HTTP server running on Node would be trivial. Cloudflare also provides a way to run the workers as is locally, using miniflare, but I wouldn't suggest doing that. You might as well just setup an API at that point.